Are you looking to make the most of your Visa gift card? Adding a billing address can unlock a world of convenience and security for your online purchases.
Whether you received it as a present or bought it for yourself, knowing how to add a billing address can help ensure that your card works seamlessly for shopping, dining, and more. You don’t want to miss out on using your card effectively, especially when so many retailers require this information.
By the end of this guide, you’ll have the step-by-step knowledge you need to navigate the process with ease. Ready to get started? Let’s dive in!
Why Billing Address Matters
Adding a billing address to your Visa gift card is more than just a technical step; it’s essential for smooth transactions. You might wonder why this small detail matters. A billing address can prevent declined transactions and ensure your purchases go through without a hitch.
Enhancing Transaction Security
Your billing address acts as an added layer of security. When you shop online, retailers often require this information to verify your identity. Without it, your card may be flagged as suspicious, leading to frustrating declined transactions.
Have you ever had your card declined at checkout? It’s annoying, right? Adding your billing address can help you avoid that situation.
Facilitating Online Purchases
Most online stores require a billing address for processing payments. If you don’t provide one, you may miss out on great deals or be unable to complete your order. Always check the requirements before you start shopping.
Consider this: You find the perfect gift for a loved one, but the checkout page won’t let you proceed because your billing address is missing. That’s a frustrating roadblock that can be easily avoided.
Ensuring Accurate Shipping
Sometimes, you might want to ship your gift directly to someone else. Providing a billing address helps ensure that the transaction is legitimate and the delivery goes smoothly. It helps the retailer confirm where the payment is coming from, reducing the risk of fraud.
Imagine wanting to surprise a friend with a gift, but it never arrives because of an address mismatch. That’s something you definitely want to avoid!
Avoiding Unnecessary Fees
Some retailers charge additional fees for transactions that don’t have verified billing information. By adding your billing address, you can steer clear of these hidden costs. It’s a simple step that saves you money.
Think about your budget. Every dollar counts, and avoiding extra fees can help you stick to your financial goals.
Taking the time to add a billing address to your Visa gift card can make a significant difference in your shopping experience. It keeps your transactions secure, facilitates online purchases, ensures accurate shipping, and helps you avoid unnecessary fees. Why risk the hassle when a quick update can make your shopping smoother?
Credit: www.alphr.com
Checking Card Activation Status
Before adding a billing address to your Visa gift card, check if it is activated. An activated card allows you to use it for online purchases. It is important to ensure the card is ready for use.
Many people forget to activate their cards. This can lead to confusion and frustration. Checking the activation status is quick and easy.
How To Check Activation Status
To check your card’s activation status, visit the card issuer’s website. Most issuers provide a simple tool for this. You will need the card number and security code.
Enter the required details in the designated fields. Click on the “Check Status” button. The system will show if your card is active or not.
Contact Customer Support
If you cannot check the status online, contact customer support. Look for the phone number on the back of your card. They can help you verify your card’s status.
Be ready to provide the card number and other details. This will help them assist you faster.
Understand Activation Issues
Sometimes, cards may not activate due to issues. Check if the card was purchased correctly. If it was a gift, ensure the giver activated it.
Keep in mind that some cards require activation before use. Following the instructions can prevent problems.
Gathering Necessary Information
Before adding a billing address to your Visa gift card, gather the right details. This step is crucial for smooth online transactions.
Start by locating your Visa gift card. You will need the card number and the security code. These are usually found on the back of the card.
Card Number
The card number is a 16-digit number. It is essential for online purchases. Write it down carefully to avoid errors.
Security Code
The security code is a three-digit number. This code is also on the back of the card. Keep this information secure, as it protects your card.
Personal Information
Gather your personal information next. This includes your name, address, and phone number. You will need these details to set up the billing address.
Email Address
Make sure to have an email address ready. This is important for account verification. You may also receive transaction updates here.
Online Account Access
Check if you have an online account with the card issuer. This can make the process easier. If not, you may need to create one first.
With all this information ready, you can proceed to add your billing address. This will help ensure your Visa gift card works smoothly for online purchases.
Visiting The Card Issuer’s Website
To add a billing address to your Visa gift card, visit the card issuer’s website. Look for the option to manage your card details. Enter your new billing address in the required fields to complete the process.
Visiting the card issuer’s website is a crucial step in adding a billing address to your Visa gift card. Many people overlook this detail, but it can make your shopping experience smoother and help avoid potential issues. Let’s walk through the process of accessing the right website and finding the account setup page.
Locating The Website Url
Finding the correct website for your Visa gift card is the first step.
– Check the back of your card. There should be a customer service number or a website listed.
– You can also search online using the card brand’s name. Make sure to click on the official website to avoid scams.
Using the right URL is essential for securing your personal information. If you accidentally land on a third-party site, you might be putting your data at risk.
Navigating To The Account Setup Page
Once you’re on the official site, look for the section dedicated to managing your card.
– Typically, this is labeled as “Account Setup” or “Manage Your Card.”
– You might need to create an account if you haven’t done so already.
Think about the last time you had to enter your billing address for an online purchase. Frustrating, right? Having your address linked to your gift card can save you time and hassle.
Follow the prompts to add your billing address. This will ensure that your card works seamlessly for online transactions, especially when you’re checking out at your favorite store.
By adding your billing address, you’re not just enhancing your shopping experience; you’re also reducing the chances of declined transactions. Wouldn’t it be great to shop without worrying about your payment method?
Creating An Online Account
To add a billing address to your Visa gift card, first, create an online account with the card issuer. Next, log in and find the option to update your billing information. Enter your address details, then save the changes. This will help you use your card for online purchases.
Creating an online account for your Visa gift card is a straightforward process. It opens the door for you to manage your card details, check your balance, and set up a billing address. Once you’ve got your account set up, you’ll enjoy greater control over your spending and transactions.
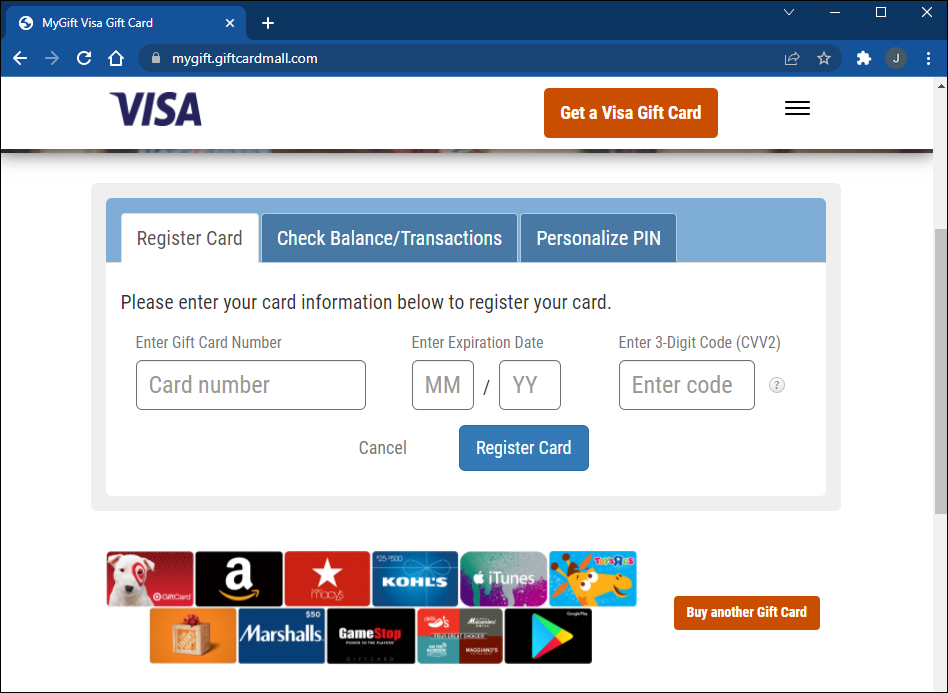
Entering Card Details
Start by visiting the website designated for your Visa gift card. Look for the option to create an account. You will need to enter your card number, expiration date, and security code.
Make sure to double-check your entries. A small mistake can lead to delays or errors in setting up your account.
Don’t forget to have your card handy. This will make it easier to input the details accurately.
Setting Up Login Credentials
Next, you’ll need to create your login credentials. Choose a strong password that combines letters, numbers, and symbols. This will help protect your account from unauthorized access.
After entering your password, you may be asked to provide an email address. This will be used for verification and recovery purposes.
Consider enabling two-factor authentication if available. This adds another layer of security and ensures your account stays protected.
Creating an online account not only helps you manage your Visa gift card but also gives you peace of mind. You’ll have everything in one place, making it easy to track your spending. Have you created your account yet? It’s worth the effort!

Credit: www.youtube.com
Adding The Billing Address
Adding a billing address to your Visa gift card is important. It helps when making online purchases. Many websites require this information for verification. Follow these simple steps to add your billing address.
Locating The Billing Address Section
First, find the website or app where you registered your Visa gift card. Look for the account settings or profile section. You should see an option for billing information. Click on that option to proceed.
Some sites may have a separate section for gift cards. If so, navigate there. Locate the billing address field. This is where you will enter your details.
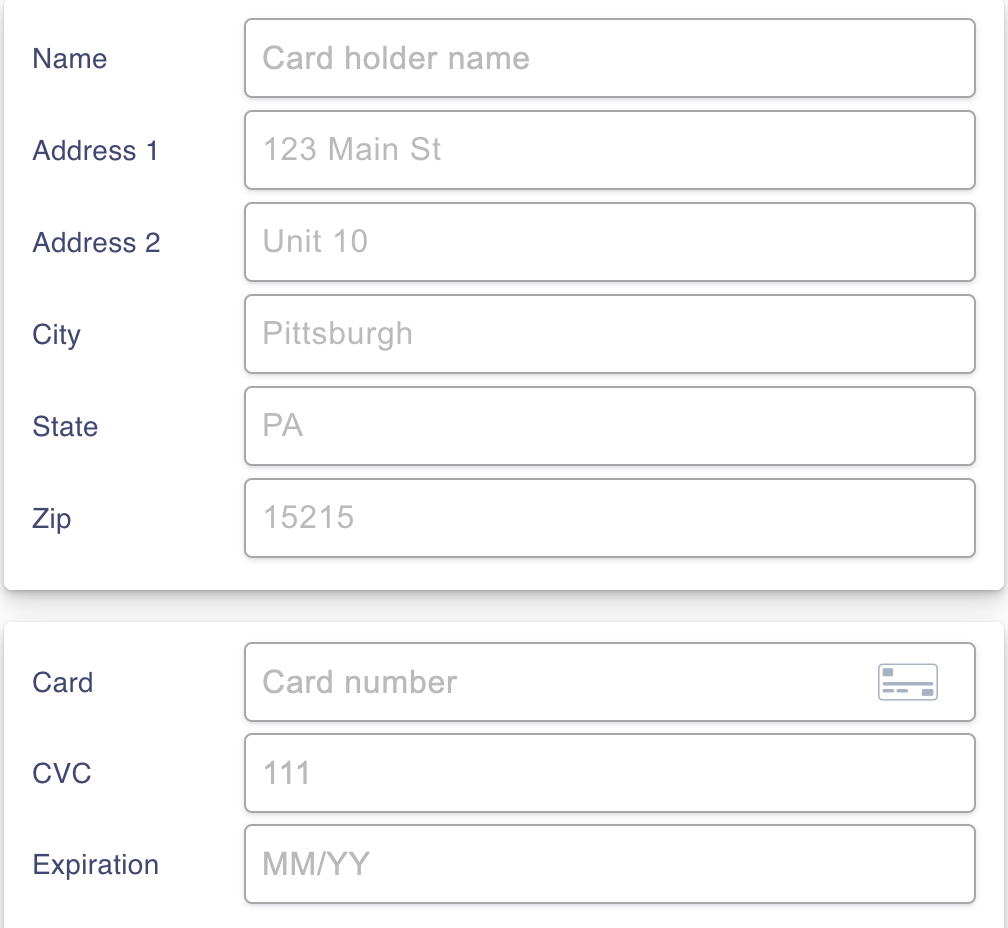
Filling In Address Details
Now, it’s time to fill in your address. Start with your name. Enter your street address next. Include the city and state. Finally, add your zip code.
Double-check all the information. Make sure everything is correct. An incorrect address can lead to issues during checkout.
Once you have filled in the details, save the changes. You may need to verify the new information. Check your email for a confirmation message. This ensures your billing address is updated.
Saving And Verifying Changes
After you add a billing address to your Visa gift card, saving and verifying changes is important. This step ensures that your information is correct. It helps prevent issues when using the card.
Submitting The Information
Once you enter your billing address, look for the “Submit” button. Click it to send your information. Wait for a moment. The system will process your request.
Make sure to check for any error messages. If there are errors, correct them. Then, submit the information again. This ensures your billing address is up-to-date.
Confirming The Update Via Email Or Website
After submitting, check your email for a confirmation message. This email confirms that your changes were successful. Sometimes, you can also confirm changes on the website.
Log into your account to view your billing details. Make sure the new address appears correctly. This step is key to ensuring you can use your Visa gift card without issues.
Credit: prestmit.io
Troubleshooting Common Issues
Adding a billing address to a Visa gift card can be tricky. Common issues include incorrect information or system errors. Follow simple steps to troubleshoot these problems and ensure your card works smoothly.
Troubleshooting common issues when adding a billing address to your Visa gift card can save you time and frustration. Many users encounter problems during this process, which can prevent them from making online purchases or using their card effectively. Let’s address some of the common hurdles you might face.
Address Not Accepted
If your billing address is not accepted, check that all details match what your card issuer has on file. Even small discrepancies, like a missing apartment number or a typo in your street name, can cause issues.
Ensure you enter the address exactly as it appears on your card. If you’re unsure, verify your information by logging into your card account online.
Sometimes, the billing system may not recognize certain addresses. If you recently moved, your card might still be linked to your old address. Contact customer service for assistance in updating your address.
Errors With Card Details
Errors can occur if you enter your card number, expiration date, or security code incorrectly. Double-check each digit to ensure accuracy. It’s easy to mistype, especially on mobile devices.
If you’re still facing issues, try using a different browser or device. Sometimes, technical glitches can interfere with the process.
Another common error arises from using an expired card. Always check the expiration date before attempting to enter your card details. If your card has expired, you may need to obtain a new one.
Have you faced any of these issues while trying to add your billing address? Sharing your experiences can help others navigate similar challenges.
Tips For Secure Transactions
Using a Visa gift card online needs care. Secure transactions protect your money. Follow these tips to keep your information safe.
Use Trusted Websites
Shop only on websites you know. Check for security signs. Look for “https://” in the URL. This means the site is secure.
Keep Your Card Information Private
Never share your card number. Don’t give out your PIN or security code. This keeps your account safe from theft.
Monitor Your Transactions
Check your card balance often. Report any unknown charges right away. Quick action helps prevent further loss.
Enable Alerts
Set up alerts for transactions. Get notified of any spending. This helps you spot any fraud quickly.
Use Strong Passwords
Choose strong passwords for your accounts. Avoid easy-to-guess words. Use a mix of letters, numbers, and symbols.
Be Aware Of Phishing Attempts
Watch out for emails or texts asking for your card info. Legitimate companies won’t ask for this information. Always verify the sender before responding.
Frequently Asked Questions
How Do I Add A Billing Address To My Visa Gift Card?
To add a billing address to your Visa gift card, visit the card issuer’s website or call their customer service. You will need your card number and personal details. Follow the prompts to enter your billing address. This helps with online purchases and protects against fraud.
Can I Use My Visa Gift Card Without A Billing Address?
Yes, you can use your Visa gift card without a billing address. However, many online retailers require a billing address for verification. Without it, you might face issues during checkout. It’s advisable to add a billing address to ensure smoother transactions.
What If I Forgot To Add A Billing Address?
If you forgot to add a billing address, you can still do it later. Visit the issuer’s website or call their support. They will guide you through the process. Just have your card details handy to update your information quickly.
Is Adding A Billing Address Necessary For Online Shopping?
Adding a billing address is often necessary for online shopping. Many retailers require it for payment verification. This helps prevent fraud and ensures that the transaction is secure. Without it, you may encounter difficulties completing your purchase.
Conclusion
Adding a billing address to your Visa gift card is simple. Follow the steps outlined in this guide. This process helps when shopping online. It ensures your card works correctly. Always check your details for accuracy. You can avoid issues during checkout.
Understanding this process makes using your card easier. Enjoy the freedom of your Visa gift card. Take control of your purchases today.
References
- Fundamentals of cards business
- Mobile payment: a journey through existing procedures and standardization initiatives
- [B] Developing and managing a successful payment cards business
- [B] Smart card application development using Java
- “Think of it as Money”: A History of the VISA Payment System, 1970–1984